Merry Christmas and Happy Holidays to all! I hope this post finds you in a cheerful and festive way.
This past month, my son and I have been thinking about a way to get a picture of the elusive Santa Claus! We got the Idea from a Make! Weekend Project post. We’ve had to be extra careful because Santa has his embedded helper (spy), Chippy, watching our every move. Since Chippy has gone back to the North Pole to help Santa with his last minute preparations, Xander and I found our opportunity get this next project done. It is a simple frame capture using some inexpensive items we already had, so this didn’t cost us anything. However, if you were starting from scratch, I estimate this project would cost between $90.00 – $120.00.
Operation Polar Bear
First, here’s a list of the items we used to pull this off:
- BeagleBone Black
- Logitech HD C525 Webcam
- 4-port USB Hub (as small as you can get it – I had to take the cover off mine)
- 8GB thumb drive (for storing images)
- Radio Shack Project Box
- 5V Power Supply
- Drill and various drill bits
First, I put everything together and proto-typed the build. Once I verified everything was working as I had intended, I reached for the Project box.
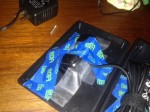
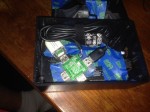
I drilled one hole in the center of the lid for the camera and two holes on left-hand side of the box for power and networking (left or right makes no difference but you will want to position the BBB length-wise to make room for the USB hookup). I turns out that my double-sided tape was used by Chippy (do you think he knows something?) so I had to improvise and use a combination of medical and painters tape to secure everything to my box.
Since we have very little time and this is a temporary installation, I was not very tidy with the side hole. NOTE: Be tidy with the side holes and give yourself plenty of space. You will thank me later.
I then mounted the BBB, the USB hub, and the thumb drive into the box. After one last check, I sealed it up and did a test. (See my post on mounting a USB drive HERE)
Once everything was working, it was time to fine tune the system. Here’s what I did to get the system running:
I am running Ubuntu 12.10 on my BeagleBone Black. I have mounted a 16GB thumb drive to it using my USB passive hub to “/media“. I created the folder structure under media to hold my images “/media/capture/polar-bear”.
Next I installed fswebcam. I based my fswebcam build off a blog post HERE:
apt-get install fswebcam
To make this process work (time-lapse style), I created a configuration file and saved it in my home folder, called “polarcam.conf“, which I will explain:
device /dev/video0
input 0
loop 2
skip 10
#background
resolution 640x480
set brightness=60%
set contrast=13%
top-banner
font /usr/share/fonts/truetype/msttcorefonts/arial.ttf
title "Santa-CAM"
timestamp "%m-%d-%Y %H:%M:%S (%Z)"
jpeg 95
save /media/capture/polar-bear/polarcam-%Y%m%d-%H:%M:%S.jpg
palette MJPEG
Device: this is your webcam. In most instances, it will be /dev/video0 unless you have other video sources plugged in.
Loop: this is the delay between frames, in seconds. Since I figured Santa was a busy guy and would be trying to get in and out rather quickly, I set this for 2 seconds.
Skip: this is the number of frames to skip at startup. Most camera have a short warm-up period where colors and brightness are not exact. I set mine for 10 seconds but you can adjust for your particular device.
Background: runs the app in quiet mode if you are using it interactively. I leave this commented out until I am ready to put it into “production”
Resolution: This is the video resolution. A smaller image size saves space and bigger has better image quality. Based on your needs, and storage, you will be able to modify and adjust accordingly.
Top-banner: This puts a banner at the top where you can put the name of the camera and a time stamp. I haven’t played around with this but I believe you can put this at the bottom too.
Title: Whatever you want to call this camera. It will be superimposed in the banner on every frame.
Timestamp: Puts the date and time on each image as it was taken. This can be modified.
Save: This is the path to where I want to save my images.
I really didn’t mess with the other parameters but you can get the details on all the available parameters and add them to your config by using the “fswebcam –help” command.
To test this, I simply entered the following:
sudo fswebcam -c <path-to-config-file>/fswebcam.conf
If the background parameter is commented, then the output should look something like this:
dfrey@ubuntu-armhf:~/fswebcam$ sudo fswebcam -c polarcam.conf

>>> Next image due: 2013-12-24 09:59:52 (EST)
--- Opening /dev/video0...
Trying source module v4l2...
/dev/video0 opened.
--- Capturing frame...
Skipping 10 frames...
Capturing 1 frames...
Corrupt JPEG data: 1 extraneous bytes before marker 0xd3
Captured 11 frames in 0.34 seconds. (32 fps)
--- Processing captured image...
Putting banner at the top.
Setting font to /usr/share/fonts/truetype/msttcorefonts/arial.ttf.
Setting title "Santa-CAM".
Setting timestamp "%m-%d-%Y %H:%M:%S (%Z)".
Setting output format to JPEG, quality 95
Writing JPEG image to '/media/capture/polar-bear/polarcam-20131224-09:59:52.jpg'.
>>> Next image due: 2013-12-24 09:59:54 (EST)
--- Opening /dev/video0...
Trying source module v4l2...
/dev/video0 opened.
--- Capturing frame...
Skipping 10 frames...
Capturing 1 frames...
Corrupt JPEG data: 1 extraneous bytes before marker 0xd1
Captured 11 frames in 0.34 seconds. (32 fps)
--- Processing captured image...
Putting banner at the top.
Setting font to /usr/share/fonts/truetype/msttcorefonts/arial.ttf.
Setting title "Santa-CAM".
Setting timestamp "%m-%d-%Y %H:%M:%S (%Z)".
Setting output format to JPEG, quality 95
Writing JPEG image to '/media/capture/polar-bear/polarcam-20131224-09:59:54.jpg'.
>>> Next image due: 2013-12-24 09:59:56 (EST)
… and so on until you stop it (CTRL-C). I noticed that there were a couple error messages regarding corrupt images but when I looked back at them, they looked ok, so I disregarded them.
If the “background” parameter is uncommented, you will see nothing and the app will run until the cows come home (translation: until you run out of storage space or turn off the BBB). However, you can shut it off using this command:
sudo pkill fswebcam
Automation
Now that I have the app and hardware to get the job done, I have to make a decision as to how I want to start and stop the application. I tried putting the start command in my .bashrc file and it worked but it just runs forever and that’s just not enough control for me. After talking with Xander, we decided that we needed to limit the amount of time the camera ran so we could get as many images as possible. We decided that between 11:30pm and 1:00AM would be fine b/c Santa has historically made his rounds in our town by 1:00AM (based on NOAA, NASA and NORAD data). I elected to start and stop the process with a cron job (pronounced: CRAN JAB).
Here’s my script for root:
sudo crontab -e -l root

@reboot /opt/startup.sh

00 */12 * * * ntpdate -b -s -u pool.ntp.org
30 23 * * * fswebcam -c /home/dfrey/fswebcam/polarcam.conf
00 01 * * * pkill fswebcam
The last two lines are where the magic happen. At 11:30PM, the fswebcam process will start, using my polarcam config file. This will run continuously until 1:00AM, where the process is killed.
Last night, I tested this a couple times. I did have some trouble with it not actually running but I think that this was because I didn’t give the BBB enough time to boot up after moving it to the target location. However, my final test was successful and I was able to capture 30 minutes of images @ 1 per 2 second intervals. Something else to note is that this camera has an IR filter on it, so it cannot use IR LEDs to illuminate dark rooms. I will have to insure that the room has adequate lighting for our “Polar Bear.” I will be upgrading this project to include and IR-ready camera and a PIR motion sensor.
Well, today is the big day. After 46 years of trying to catch that Jolly Ol’ Elf in the act, I think I finally have a solution. Check back in a couple days to see Santa in Action!
Thanks for stopping by. Merry Christmas and a Happy New Year to all!


